We did a lot of work this year on OpenStack and Hyper-V integration, with the result of bringing back Hyper-V in the Nova sources in time for the Folsom release. We are currently working on a lot of cool features to be released in time for Grizzly, so stay tuned!
One of our goals was being able to install and configure Nova compute on Hyper-V in the simplest possible way, using a nice and tidy GUI for the occasional deployment or an automated and unattended mode for deployments on a massive number of servers. The result is the installer that I’m going to present in this post, I have to admit that we are quite proud of it 🙂
To begin, all you need is an installation of the Microsoft free Hyper-V Server 2008 R2 or 2012 or as an alternative Windows Server 2008 R2 or 2012 with the Hyper-V role enabled.
We suggest to use the free Hyper-V Server edition instead of Windows Server for a few reasons:
- It’s free 🙂
- It runs a very limited subset of the Windows Server operating system, which means that it has a lower impact on security updates and management
- There’s no difference in features or performance compared to the full Windows Server
If you want to see how Hyper-V works with OpenStack but you don’t have a server or PC on which to install it, well you can even run it on top of another hypervisor (for test purposes only, this is of course TOTALLY unsupported). As an example you can run it in a VM on top of VMWare Workstation 9, Fusion 5 or ESXi 5.
Hyper-V Nova Compute Installer
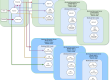
We are going to install on Hyper-V only the OpenStack Compute role, so you’ll need to run the other required roles on separate hosts or VMs. If you don’t plan to deploy it in a production environment, I suggest you to create an Ubuntu Server 12.04 VM in Hyper-V or elsewhere with a DevStack deployment.
Once your Hyper-V setup is done, you can copy our installer on a folder on the server and run it.
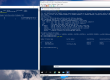
On Hyper-V / Windows Server 2012, you can even download and run it directly from a Powershell prompt:
|
1 2 3 4 5 |
$src = 'http://www.cloudbase.it/downloads/HyperVNovaCompute_Folsom.msi' $dest = "$env:temp\HyperVNovaCompute_Folsom.msi" Invoke-WebRequest -uri $src -OutFile $dest Unblock-File $dest Start-Process $dest |
Here’s how the welcome screen look like:

After accepting the license agreement the features selection will appear:

OpenStack Nova Compute
This is the core feature of the package. It installs a dedicated Python environment, all required dependencies and a Windows service called nova-compute. By clicking on “Browse” it is possible to change the installation folder.
Live Migration
Available on 2012 but not in 2008 R2, requires the host to be a member of a domain (can be even a Samba domain). This feature enables and configures Hyper-V “shared nothing” live migration. Beside KVM, Hyper-V is the only OpenStack hypervisor supporting it, with the additional advantage that thanks to this installer it’s unbelievably easy to setup!
iSCSI Initiator Service
Enables and starts the Microsoft iSCSI initiator service, required for Cinder volume management.
OpenStack Command Prompt
Creates an OpenStack command prompt shortcut. This is especially useful on Windows Server or on a workstation in order to have a ready made environment with the PATH and other environment variables properly set.
FreeRDP for Hyper-V
FreeRDP is an amazing cross platform open source RDP client that works also with the Hyper-V RDP extensions required to connect to VM consoles. I blogged here in detail about it.
The next steps are required to handle the service configurations and are displayed in function of the selected features.

Nova compute requires one bridge (virtual switch in Hyper-V terms), which can be automatically created by the installer.

The basic configuration consists in providing the settings for the glance server address, RabbitMQ server address, Nova database and the path where the Nova compute driver will save the Hyper-V instances and Glance images.

“Limit CPU features” is required when live migration is used between servers with different CPU architectures.
When “Use CoW Images” is enabled, the Nova compute driver creates differencing disks based on the glance VHD images, instead of copying the entire image for each spawned instance. This leads to massively shorter instance deployment times.

Here’s one of my favorite parts. Live migration can be configured here without having to use Microsoft Hyper-V Manager or Powershell. All you have to do is to choose the authentication type (we suggest Kerberos), the maximum number of parallel live migrations, and IP limitations if needed. Please note also that live migration requires that the Nova Compute service runs with domain credentials. The selected domain user will be automatically added to the local administrators group.

Now lean back, relax, and wait for the installer to do his job 🙂
During this step files get copied, services and components get registered, the nova.conf file is written and finally the nova-compute service is started
Once the setup is finished, you can always start it again to change / add / remove any feature.
FAQ
here’s also a quick FAQ for activities that you might need to perform on the Hyper-V server.
How do I restart the compute service?
|
1 |
net stop nova-compute && net start nova-compute |
How do I restart the iSCSI initiator service service?
|
1 |
net stop msiscsi && net start msiscsi |
How do I perform an unattended setup
You can find here all the supported properties and a full example.
How do I log the installer activity?
|
1 |
msiexec /i HyperVNovaCompute_Folsom.msi /l*v log.txt |
How do I uninstall this package if I don’t have the MSI file?
|
1 |
msiexec /uninstall {792BADAA-8FE0-473C-BAD7-CAFA2AFF4F2D} |


When using the installer on Windows 8 Enterprise I do not get any options for the Virtual Switch. I already have one configured, and it does not show in the list. Additionally, if I choose for the installer to create one the network interface list is also empty. Any thoughts how I should proceed? Thanks!
I’m currently traveling back to Europe, going to take a look at your issue as soon as I get to the office. In the meantime you can pass the vswitch name on the command line, see the unattended mode page for details, thanks
Hi Matt,
I replicated your issue. On Windows 8 for the moment you need to start the installer from an elevated command prompt. We’re going to update the installer in order to always start elevated.
Hi Matt,
the installer requires elevation on Windows 8. We just updated the MSI to show a warning in case of missing privileges.
Well done, thanks. I wish the install on Linux was as easy 8-
Tx Frank! 🙂
One of our goals was to make the process as easy as possible.
I get error: “Invalid parameter” when trying to install on Windows Server 2012.
Any help would be appreciated.
Thanks.
Please Help. Same Error. Windows 2012 Standard with Hyper-V Role installed.
Here is the log after running msiexec /i HyperVNovaCompute_Folsom.msi /l*v log.txt
MSI (c) (7C!4C) [01:36:27:259]: PROPERTY CHANGE: Adding CA_EXCEPTION property. Its value is ‘Invalid parameter ‘.
Invalid parameter
MSI (c) (7C!4C) [01:36:30:071]: Product: OpenStack Hyper-V Nova Compute — Invalid parameter
CustomAction exception details: 0x80041008 : Invalid parameter
Action ended 1:36:30: CheckLiveMigration. Return value 3.
MSI (c) (7C:4C) [01:36:30:071]: Doing action: FatalError
Action 1:36:30: FatalError.
Action start 1:36:30: FatalError.
Action 1:36:30: FatalError. Dialog created
MSI (c) (7C:14) [01:36:30:087]: Note: 1: 2205 2: 3: _RemoveFilePath
Action ended 1:36:31: FatalError. Return value 2.
Action ended 1:36:31: INSTALL. Return value 3.
I had this problem, I got the error with a Domain account, but not with the local administrator account.
I solved this error on windows 2012 server by just restarting the Hyper-V 🙂
If you are installing openstack on a fedora box using the EPEL method you will need to manually edit the nova.conf file created on the hyper-v host and add in the following options otherwise the nova compute service will think its trying to connect to a rabbit MQ server and not a qpidd messaging server
( The full list of options are here http://docs.openstack.org/trunk/openstack-compute/admin/content/configuration-qpid.html)
rpc_backend=nova.rpc.impl_qpid
qpid_hostname=hostname.example.com
You will also need to install qpid-python using the python pip or easy_install method
Once you have installed the plug-in you will need to restart the compute service.
Hi Jaime,
Qpid support is already provided by the Grizzly installer for Hyper-V and above, including the configuration lines in your comment. What version of the installer are you using?
Thanks
I am new to OpenStack on Hyper. I have successfully installed Folsom on my windows server 2012 test environment.
I do not know how to configure my cloud? Please help
In order to help you it’s better if you get in touch with our community on #openstack-hyper-v or #openstack-dev (FreeNode)
how can I access the Horizon? My environment is
Hyper-V 2012 running on VirtualBox
1 ethernet
60GB HD
4096 RAM
thank you in advance
Horizon is not part of Nova compute, so you should install it as part of the rest of your OpenStack deployment, for example: http://www.cloudbase.it/rdo-multi-node/
Hi Alessandro,
Nice tutorial! 🙂
Whenever I try to run instance I get following error on Hyper-v, Any clue?
Instance failed to spawn
…
Solutions\OpenStack\Nova\Python27\lib\site-packages\nova-2013.1.2-py2.7.egg\nova\virt\hyperv\imagecache.py”, line 61, in _resize_and_cache_vhd
2013-08-06 15:35:05.013 1556 TRACE nova.compute.manager [instance: cae58836-bf18-4030-9dec-79a8682dc4c9] vhd_info = self._vhdutils.get_vhd_info(vhd_path)
2013-08-06 15:35:05.013 1556 TRACE nova.compute.manager [instance: cae58836-bf18-4030-9dec-79a8682dc4c9] File “C:\Program Files (x86)\Cloudbase Solutions\OpenStack\Nova\Python27\lib\site-packages\nova-2013.1.2-py2.7.egg\nova\virt\hyperv\vhdutils.py”, line 81, in get_vhd_info
2013-08-06 15:35:05.013 1556 TRACE nova.compute.manager [instance: cae58836-bf18-4030-9dec-79a8682dc4c9] self._vmutils.check_ret_val(ret_val, job_path)
2013-08-06 15:35:05.013 1556 TRACE nova.compute.manager [instance: cae58836-bf18-4030-9dec-79a8682dc4c9] File “C:\Program Files (x86)\Cloudbase Solutions\OpenStack\Nova\Python27\lib\site-packages\nova-2013.1.2-py2.7.egg\nova\virt\hyperv\vmutils.py”, line 363, in check_ret_val
2013-08-06 15:35:05.013 1556 TRACE nova.compute.manager [instance: cae58836-bf18-4030-9dec-79a8682dc4c9] self._wait_for_job(job_path)
2013-08-06 15:35:05.013 1556 TRACE nova.compute.manager [instance: cae58836-bf18-4030-9dec-79a8682dc4c9] File “C:\Program Files (x86)\Cloudbase Solutions\OpenStack\Nova\Python27\lib\site-packages\nova-2013.1.2-py2.7.egg\nova\virt\hyperv\vmutils.py”, line 393, in _wait_for_job
2013-08-06 15:35:05.013 1556 TRACE nova.compute.manager [instance: cae58836-bf18-4030-9dec-79a8682dc4c9] “%(error)s”) % locals())
….
‘HyperVException: WMI job failed with status 10. Error details: 104Failed to get the disk information.15268Microsoft-Windows-Hyper-V-VMMS30\n’]
Please help
Looks like the image is not a valid VHD.
Can you please post the command you executed to create the Glance image?
I’d check also that the hash of the downloaded file is correct.
Hi Shrirang,
Alessandro is right, I have encountered the same problem, but fix it as the following ways:
1. It must use a vhd format image on hyperv to boot image
2. When first booting vm with this vhd format image, it will be copied to \instances\_base\
make sure it is copied completely.
https://answers.launchpad.net/nova/+question/233600
Correct, Hyper-V on Grizzly requires VHD. For Havana we are supporting VHDX as well.
I’ve installed the Nova Compute setup on my Hyper-V Server. The compute node shows up in my dashboard, but when I launch an instance, I receive the following error in the nova-compute log on the Hyper-V server:
2013-09-03 00:49:35.078 4560 ERROR nova.openstack.common.rpc.amqp [req-a60a1c87-9db1-44c0-8b34-24980da8cf66 c02c0e2bcb3a4009bcafa9ece93d016d ecefb3746dc74435b7d424e0de4faaaa] Exception during message handling
2013-09-03 00:49:35.078 4560 TRACE nova.openstack.common.rpc.amqp Traceback (most recent call last):
2013-09-03 00:49:35.078 4560 TRACE nova.openstack.common.rpc.amqp File “C:\Program Files (x86)\Cloudbase Solutions\OpenStack\Nova\Python27\lib\site-packages\nova\openstack\common\rpc\amqp.py”, line 421, in _process_data
2013-09-03 00:49:35.078 4560 TRACE nova.openstack.common.rpc.amqp **args)
2013-09-03 00:49:35.078 4560 TRACE nova.openstack.common.rpc.amqp File “C:\Program Files (x86)\Cloudbase Solutions\OpenStack\Nova\Python27\lib\site-packages\nova\openstack\common\rpc\dispatcher.py”, line 178, in dispatch
2013-09-03 00:49:35.078 4560 TRACE nova.openstack.common.rpc.amqp raise rpc_common.UnsupportedRpcVersion(version=version)
2013-09-03 00:49:35.078 4560 TRACE nova.openstack.common.rpc.amqp UnsupportedRpcVersion: Specified RPC version, 2.37, not supported by this endpoint.
2013-09-03 00:49:35.078 4560 TRACE nova.openstack.common.rpc.amqp
I can see that it says unsupported RPC version, but I don’t know how to fix it. I built my controller node on Ubuntu Precise using the devstack scripts.
Any help would be appreciated, thank you.
Donald
It means that the version of Nova running on the Hyper-V compute node differs from the version running on your controller.
This applies only to the beta of course (Havana at the moment) typically when used with Devstack. Since the installer is generated automatically every night, make sure to use the latest one available.
As an alternative, since Devstack pulls the latest master sources from github, you can do the same on the compute node:
Nova sources:
pushd .
git clone https://github.com/openstack/nova.git
net stop nova-compute
pip uninstall nova
cd nova
python setup.py install
net start nova-compute
popd
Same procedure for Neutron:
pushd .
git clone https://github.com/openstack/neutron.git
net stop neutron-hyperv-agent
pip uninstall neutron
cd neutron
python setup.py install
net start neutron-hyperv-agent
popd
I setup this installer successfully and the hyper-v compute node connect to the controller node installed by the rdo. but the guest OS fail to get the IP address as expected. for example the expected is 192.168.32.2 : the fact is 169.x.x.x.x. I guess the config drive don’t work. but I don’t find any error message in compute.log , could you please help me to solve this problem? I don’t install quantum agent. the below is my nova.config on hyper-v. your support is very appreciated.
(edited to remove the long config settings, please use paste.openstack.org or a similar solution and paste a link in future posts 🙂 )
Can you please provide some more context about your Quantum network configuration? Are you using VLANs?
I have installed Grizzly on my Hyper-V server. I am getting the following error:
2013-10-29 02:50:09.523 WARNING nova.conductor.api [req-37591869-a792-4caf-8ddf-6b7e5896fe29 None None] Timed out waiting for nova-conductor. Is it running? Or did this service start before nova-conductor?
(edited to remove log, please use paste.openstack.org or a similar solution and paste a link in future posts :-))
It’s always hard to troubleshoot an iassue without a complete picture. This could be related to either wrong RPC backebd settings (RabbitMQ / Qpid) or to a misconfigured stack_exchange. I’d start by comparing the options in the controller’s nova.conf with the Hyper-V compute node ones.
This is my first time to integrate cloudbase nova-compute in openstack.
We are installing in a multi-node setup consists of controller node, network node and the Hyper-v Server.
First, I would like to ask about ceilometer on nova-compute.
based on the this tuts: http://docs.openstack.org/trunk/install-guide/install/apt/content/ceilometer-install-nova.html
ceilometer-agent-compute has to be installed in nova-compute node.
If my nova-compute node is in Hyper-V, Do I still need to do it? or ceilometer-agent-compute is already installed on Cloudbase nova-compute.
Second, If I going to use cloudbase hyper-v nova-compute as openstack nova-compute, How many nova-computes can be created in 1 Hyper-v server?
Thanks a lot, nova-compute in Hyper-v did a very unique and great things.
The ceilometer compute agent gets installed starting with the Havana version of the installer, no need to install it manually.
On your next question, about how many nova-compute can be created in 1 Hyper-v server, the answer is that each Hyper-V server is one compute node.
Thanks
I’m surprise with your fast feedback.
Thanks a lot Alessandro.
Np 🙂
Hi,
I could get the nova-compute start successfully, by pointing it to controller’s rabitmq. Earlier i was using rabitmq on hyper-v itself, that’s why there was an error. It is supposed to on controller node.
Now, I created a CirrOS test image in glance(on controller), while booting that image using “$nova boot …args” command, its Task Status remains in “Spawning” for some time then goes in ERROR state(from $nova list).
I checked the the nova-compute logs(on compute node) there is error related to “Version 1.10 of Instance is not supported”
http://paste.openstack.org/show/50774/
I am running latest devstack code base on controller.
I tried running with Havana and Grizzly hyper-v nova msi as well, getting the same error on both cases.
I am not able to understand what is the version mismatch ? nova or vm instance or glance version ?
Now after restart of nova-compute its throwing same error, not even able to start itself.
Any pointers will be appreciated .
Thanks in advance.
-Swapnil
Hi Swapnil,
On the Hyper-V compute nodes you should install only nova-compute, the Neutron Hyper-V agent and optionally the Ceilometer compute agent.
beside that, the components that you use MUST have the same version on the entire stack (e.g. Havana 2013.2 or Grizzly 2013.1.3, etc).
A simple way to deploy OpenStack consists to use RDO (see: ) and our Nova Hyper-V compute installer
When attempting to install, I get a “invalid parameter” then the installer closes. Any idaes?
2012 R2.
Thanks
Hi, what version are you using, Havana or Icehouse (beta)?
Can you get a log with:
Msiexec /i installer.msi /l*v log.txt
Post it on paste.openstack.org and post the link here?
Thanks